To say the least, 2020 has been an unpredictable year, especially for eCommerce stores. This year we’ve seen the fastest growth rate in eCommerce.
The upshot of this massive migration to online business has resulted in one of the biggest booms in Facebook advertising history followed by platform instability coupled with consumer uncertainty, and most recently news that Apple’s iOS14 will give users more security control (we believe this is a good thing) mainly through preventing advertisers from being able to track off-platform actions across the web via third-party browser cookies.
Firefox has also begun increasing its security and has begun allowing users to block similar cookies, and Google intends to completely remove the ability to use them by 2022.
This is a devastating blow for social advertising platforms like Facebook, which depend heavily on cookies and pixel-based tracking to be able to attribute purchases made on advertisers’ sites to the ads served on Facebook.
This is where Facebook’s Conversions API (or CAPI) comes in. More on that in a minute…
How does Facebook’s Pixel Work Now?
To understand how this impacts measurement via the pixel, I wanted to walk through this diagram:
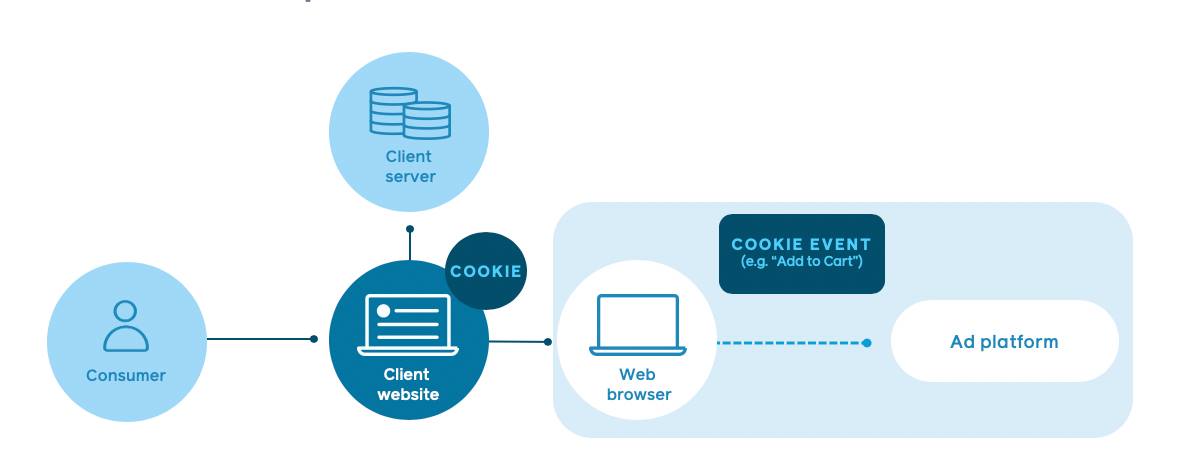
First, a consumer opens a browser and visits a website.
In this case, the data event flows through to Facebook as follows:
- Event or customer data is entered into a form field or a person clicks on a hyperlink to visit a webpage
- This triggers a request to the client’s website/server from the web browser to submit information from the form field or load the landing page
- As the form is submitted or landing page loads, the pixel event is triggered and the Facebook pixel (installed on the webpage) loads on the browser, sharing the event data with Facebook
- When anti-tracking defaults are enabled or cookies are deleted too soon, the browser will no longer be able to share this information to ad platforms or allow for retargeting.
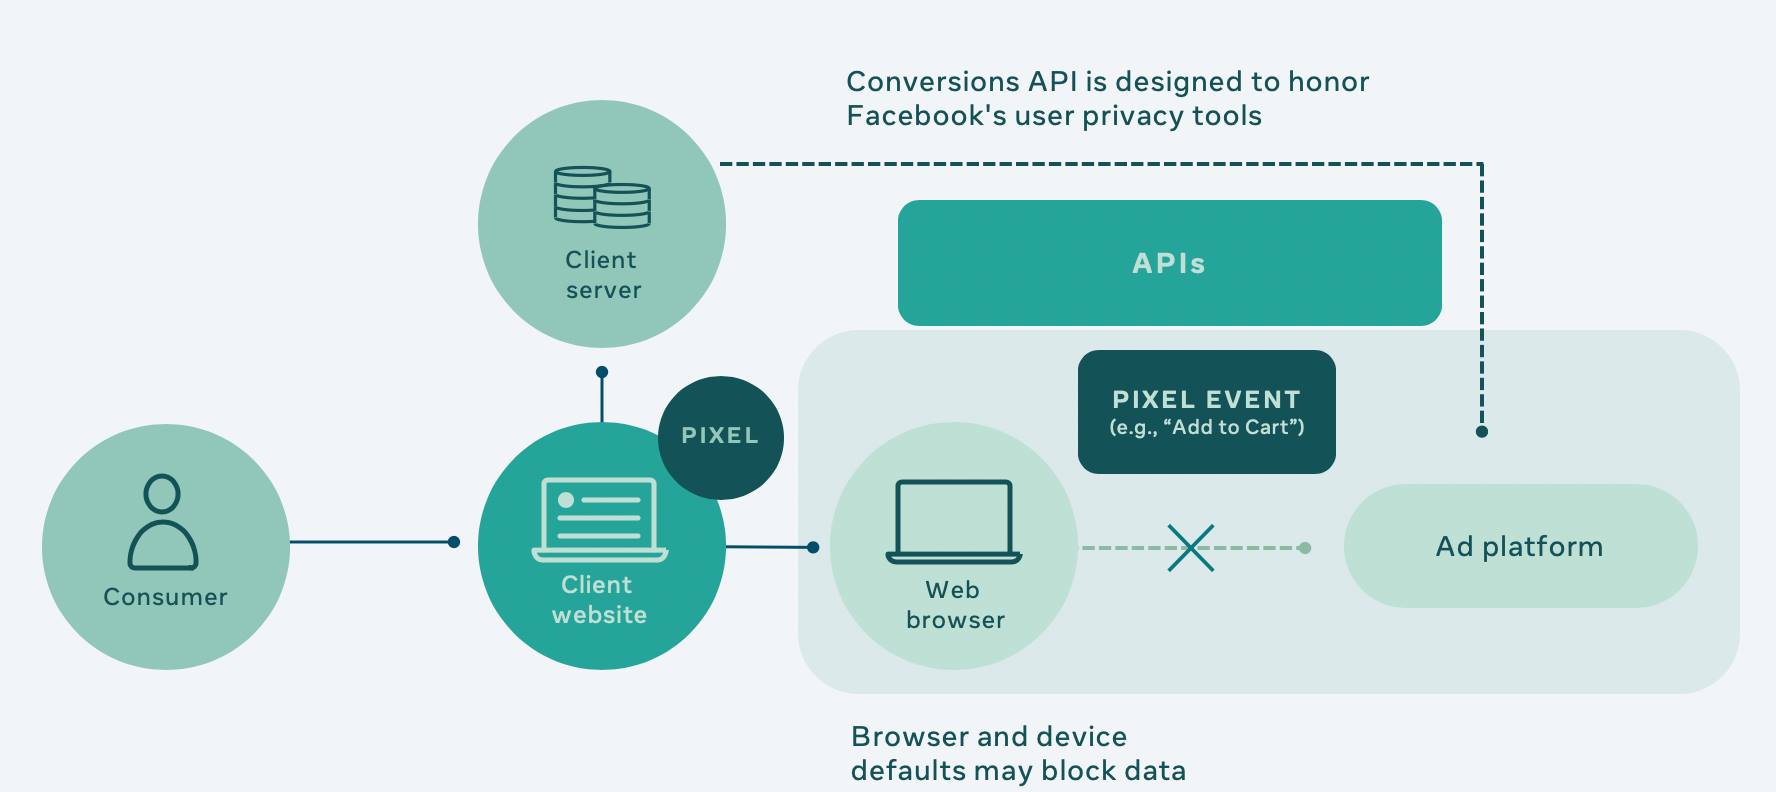
- Facebook’s Conversions API was built to help you keep pace with these browser updates and allow you to continue driving business outcomes by using information you control, rather than relying on data from a browser.
Further benefits of the Conversions API include:
- Controlling the data you share and when you share it. You can decide what data is shared with Facebook and when, and include more meaningful data about your users.
- Strengthening how you share data with Facebook. Ensure the reliability of the data you share by sending it directly to Facebook, instead of relying on browser-based methods that may be susceptible to crashes or connectivity issues.
- Enabling full funnel visibility. Get a better picture of your customers by leveraging more data sources, such as CRM data, lower funnel events including qualified leads, or multi-site conversion paths.
To sum up the difference between the API and pixel, with the API, the event fires from the client server and is passed back to the Facebook server rather than from the user browser (as is done with the pixel).
So, what is CAPI?
In light of a changing ads ecosystem that is increasingly focused on ensuring data privacy, web browsers are beginning to implement changes that will significantly impact websites’ ability to share data with digital analytics and advertising service providers.
Facebook’s Conversions API (CAPI) is a revamping of what Facebook previously called Server Side API (SSAPI). Server Side API has been around for a while and was a code-heavy option that allowed brands to create custom actions/events that could then be passed from a site’s server to Facebook for attribution.
What does CAPI do?
Conversions API builds on the benefits of SSAPI while adding new integrations and partner apps to simplify the installation process. It is intended to improve the tracking of data that is sent from your site to Facebook to provide better insights and learnings of your campaigns.
Why do you need to use CAPI?
We already know that many people browsing the internet use ad blockers or pixel-blocking extensions on their web browsers.
These block Facebook ads from being able to track the performance of the ads to attribute sales to the ads being served to a user.
We know that over the next two years the ability to attribute these actions effectively is going to continue to diminish, as browsers begin to phase out cookies. However, while ad blockers (and browsers) block cookie data from being passed on the browser side, they do not have a way of blocking the data that is passed on the server side.
So CAPI will only become more valuable in time to be passing this data from your server.
What makes CAPI useful?
The most useful cases for implementing Facebook’s Conversions API will be the opportunity to improve the quality of your data and ad performance overall.
Facebook now states that the ROI of implementing CAPI is a 150% improvement in comparison to campaigns that only convert for traffic (clicks), which will eventually be an ad buyer’s only option without the implementation of CAPI.
What’s the difference between the Pixel and the new Conversions API?
CAPI is independent of the FB pixel but for right now it is best advised to use CAPI in conjunction with the browser based pixel to send the same conversion events (e.g., ‘add to cart’ or ‘purchase’).
Keep in mind that a redundant setup requires event deduplication. This is automatic with the Shopify implementation but will need to be custom coded in all other implementations.
So how do you implement CAPI using the Shopify Integration:
you can now set it up in just a few simple steps, which can be found here:
https://www.shopify.com/facebook-instagram
and here:
https://help.shopify.com/en/manual/promoting-marketing/analyze-marketing/facebook-data-sharing
See “Choosing Facebook’s customer tracking level” –> select “Maximum” to begin sending data via Conversions API
With this new integration, we recommend implementing as soon as possible so we can get ahead of the pixel blocks.
Step 1: From the home screen of your Shopify store, click on the applications tab and install the new Facebook Sales Channel Application.
Step 2: You will be prompted to enter your individual Facebook user login information in order to proceed.
Step 3: Shopify will confirm that you want to bring Facebook into the Shopify platform.
Step 4: In this step, you will want to verify each of the assets that you are bringing into Shopify through the Facebook sales channel app. If you manage multiple assets, select through each asset drop down to ensure the correct asset has been selected.
Note: Ensure that the Automatic Advanced Matching is turned on. This will save you steps later on and ensures Shopify is passing all relevant customer data to Facebook for user match purposes.
Step 5: In this step, go through and decide which functions and features Shopify will have access to. In this instance we have all functionality turned on to allow us to manage FB account activity right within the Shopify platform. This is also relevant in order to set up Facebook & Instagram Shops later on.
Step 6: Once the Facebook Sales Channel App has completed set up, hop on over to settings. From here we will then proceed to the data settings where we can enable CAPI.
Step 7: Once you are in the data sharing setting, you’ll need to verify 3 things:
- Ensure that tracking is enabled.
- Select Maximum as it combines all data-tracking options and initiates the Conversion API.
- Confirm that the correct pixel is connected within the app. If this is not your pixel, you can disconnect it and it will prompt you to connect the correct one.
Note: Once these pieces are confirmed, you may notice that the purple confirm button is still greyed out. If this is the case, you will need to go to the Commerce settings in the middle column to accept Facebook’s commerce terms and conditions. Once done you should be able to proceed with confirming the data sharing settings.
Step 8: Once this has been activated and confirmed – you are all set!
Is it compulsory to set up CAPI?
In short – no, not yet. But it will be at some stage in the near future.
However, we’re already seeing improved results from implementing CAPI now, so we do recommend it.
Need help with your Facebook ads?
Our team are experts at using Facebook ads to generate traffic and sales through your eCommerce store.
If you need help with this in your own business, please click the button below to book in a free strategy session with us.

Hi Jenny – you always want to get legal docs from a lawyer, but here’s who I’d recommend for a cost-effective option.
Thanks for this information Catherine. Just wondering what we should have in our Terms & Conditions or Privacy Policy to cover ourselves with this collection of information?
Kind regards,
Jen Laing
We have been leaving the pixel ID in there as a backup 🙂
Thanks for the article! shopify advises to remove pixel code from the field in the preferences section but I feel like it will cause the pixel to stop working. What do you say?
Thanks for sharing this! Very interesting read and I’ve just set up the CAPI so will see if that works!
Not my best efforts with writing this one I know Helen – I’ve been in the middle of moving house at the same time. I’ll endeavour to get back and improve it when I can! But in the meantime, glad it was helpful 🙂
Thanks so much, this is really helpful to me as I am still setting up my website, and it’s the first time I’d heard of the API, and seeing my computer browser lately telling me how many advertisers it is blocking I had started to wonder about the FB pixel!
However I must say the readability/structure of this blog post was not the easiest! I felt like it was information cobbled together from multiple sources and some was then later repeated. There is a list of bullets but the final bullet point didn’t belong in the list; The reference to ‘client’ website and ‘client’ server was particularly confusing, since it sounded like FB talking to an ad agency about its clients, yet I thought the article’s voice was intended to address a brand/business owner/internal marketing person. And I didn’t feel like the diagrams helped clarify the explanation. Perhaps it’s just my long distant professional background in helping user organisations understand tech….
But the links to Shopify are much appreciated, as is the information:-)